How to remove metadata from a Word document: author names and hidden data (2026)
To remove metadata from a Word document on Windows, open a copy of the file and go to File → Info → Check for Issues → Inspect Document, choose what to check, select Inspect, then Remove All on each finding. Use a copy, because, as Microsoft puts it, “it is not always possible to restore the data that the Document Inspector removes.” Word for Mac has no inspector at all, Word for the web cannot show you the properties, and nothing here touches the names written into the text. (Source: Microsoft Support, accessed 3 September 2026.)
What metadata a Word document actually carries
The inventory comes from Microsoft itself: the categories the Document Inspector offers to check are the hidden layer, described by the people who put it there. For Word there are six. (Source: Microsoft Support.)
| Inspector category (Word) | What Microsoft says it covers |
|---|---|
| Comments, Revisions, Versions, and Annotations | Comments · revision marks from tracked changes · document version information · ink annotations. |
| Document Properties and Personal Information | Document properties, including the Summary, Statistics and Custom tabs of the Document Properties dialog box · e-mail headers · routing slips · send-for-review information · document server properties · Document Management Policy information · content type information · data-binding link information for data-bound fields · username · template name. |
| Headers, Footers, and Watermarks | Information in document headers · information in document footers · watermarks. |
| Hidden Text | Text formatted as hidden — the font effect in the Font dialog box. It “cannot detect text that was hidden by other methods (for example, white text on a white background).” |
| Custom XML Data | “Custom XML data that might be stored within a document.” |
| Invisible Content | Objects formatted as invisible. It “cannot detect objects that are covered by other objects.” |
Longer lists you may have seen include “Macros or VBA code”: on Microsoft’s page that sits on the Excel and PowerPoint tabs, not the Word one.
The properties themselves are visible without any of this: “on the Summary tab, you can add or edit the Title, Subject, Author, Manager, Company, Category, Keywords (also called Tags), and Comments.” Others are not yours to set: Word maintains “the name of the person who most recently saved a document,” which is why a file cleaned and then saved again can carry a name once more. (Sources: Microsoft, file properties; Microsoft, Document Inspector.)
How to remove metadata from Word: the Document Inspector, step by step
The Windows desktop path, quoted from the support page. (Source: Microsoft, “Inspect document”.)
- Save a copy first. Microsoft’s own warning: “We highly recommend that you use the Document Inspector on a copy of your original document, because it is not always possible to restore the data that the Document Inspector removes.”
- Open File → Info. “On the File tab, select Info.” That is the backstage view holding the document’s properties.
- Check for Issues → Inspect Document. “Select the Check for Issues box and choose Inspect Document.” The same button also sits in the Trust Center’s Privacy Options.
- Choose what to check, then Inspect. “Select which hidden data you’d like to check and select Inspect.” Ticking a box only lists what is there; the deletion comes at the next step. Two categories delete visible work rather than metadata: “Headers, Footers, and Watermarks” removes the header and footer content itself, and the first category removes the comments. Untick those only if you know what is in them, which is exactly why you run this on a copy.
- Remove All on each finding. “Any hidden properties will be listed in the results. To remove a property, select Remove All.” Removal is per category, so work down the list.
- Re-inspect before you close. “Reinspect the document or close the dialog box.” Re-inspecting is the only confirmation you get that the file is clean.
Word Document Inspector on a Mac — and in the browser
Word for Mac has no Document Inspector. Microsoft documents the gap: “Word for Mac doesn’t have a document inspector. You can, however, view or change properties manually.” The path is File → Properties: the Summary tab is where you “choose the field next to the property to edit or add to,” and on the Custom tab you “choose it under Properties … and select Delete.” That covers properties and nothing else. There is no Mac equivalent for the comment, revision, hidden-text or custom-XML categories, so on a Mac those are jobs you do in the document itself. The Mac privacy pane (application menu > Preferences > Privacy) is not the Windows save-time checkbox described below. (Sources: Microsoft, “Inspect document”; Microsoft, privacy options.)
Word for the web is thinner still: “Viewing or changing document properties isn’t currently possible in Word for the web. You can, however, view or change properties in the Word desktop app,” with the instruction to “select Editing > Open in Desktop App.” Metadata cleanup is not available where a browser-only team does its work.
What the Document Inspector does not remove
Microsoft is upfront: “There is some information that the Document Inspector cannot remove.”
- Text hidden by anything other than the Hidden font effect. The Hidden Text inspector “cannot detect text that was hidden by other methods (for example, white text on a white background),” which is how people hide a paragraph in a hurry.
- Anything behind something else. Invisible Content “cannot detect objects that are covered by other objects”: the Word version of drawing a black box over a name and calling it redaction.
- The text of the document. None of the six categories is the visible body: a perfectly inspected contract still names the parties.
One caveat for anyone who relies on markup: the first category removes “revision marks from tracked changes,” and Microsoft’s page does not say what becomes of the text underneath. Accept or reject the changes yourself first, then inspect.
How to remove the author from a Word document
“Author” is three different things in a Word file, which is why people remove it once and find it back again.
1. The property. The Author field sits on the Summary tab of File → Properties and can be edited or blanked by hand. The Document Inspector removes it as part of “Document Properties and Personal Information,” a category whose contents end with “Username” and “Template name,” so the account name and the template it came from go too.
2. The name Word writes on every save. That is what the Trust Center switch is for: File → Options → Trust Center → Trust Center Settings → Privacy Options, then “Remove personal information from file properties on Save.” Microsoft describes an option that “automatically removes personal information from the file properties when you save the file,” and notes it is “turned off in Excel, PowerPoint, and Word” and on for Publisher and SharePoint Designer. One caveat from the same page: “If you’re using version 1904, or newer, of Microsoft Office then your privacy options have moved,” so on a current install the account-level settings may sit elsewhere. (Source: Microsoft, “View my privacy options in Microsoft Office”.)
3. The name attached to comments and tracked changes. A separate mechanism — next section.
Can you anonymize comments in Word without deleting them?
Not with a documented setting. The Document Inspector’s offer is all-or-nothing: “Comments, Revisions, Versions, and Annotations” removes the comments, not the names on them.
What gets reported is a side effect. On Microsoft’s Q&A community forum, users of a SharePoint-hosted document describe comment authors turning generic: “when we save the document and reopen the name changes to ‘Author’.” The workaround in that thread is to clear the same “Remove personal information from file properties on save” option in the template those documents are based on. An answer attributed to a Microsoft MVP explains the trigger: the option “will be activated and selected on a document after someone has run the Document Inspector on the document and selected the option to remove personal information.” (Source: Microsoft Q&A — a community thread on a Microsoft domain, not an official support article.)
So comments can end up labelled “Author” instead of a person, and you can turn that off, but no supported control rewrites a name inside comments while leaving the discussion readable. And the labels were never the sensitive part: “ask Mrs Weber to confirm the account before we file” identifies Mrs Weber whoever’s name sits above it.
Does saving as PDF remove metadata? (And how to remove metadata from a PDF)
No: exporting copies the properties across, it does not clean them. Word’s PDF dialog has a switch for it: “select More Options > Options to customize your PDF,” and there, “if you want to include document properties in the PDF, make sure Document properties is selected.” Ticked means the properties travel; clearing it is a deliberate act most people never perform. The NSA’s Redacting with Confidence, written in 2005 for people publishing sanitized reports converted from Word, said the same: “merely converting an MS Word document to PDF does not remove all [sensitive] metadata automatically.” (Sources: Microsoft, save or convert to PDF; NSA, “Redacting with Confidence”, 2005.)
If the PDF already exists, cleaning it is a two-step job. Adobe’s tutorial covers the Redact tool to “permanently remove private or sensitive information from a PDF,” then sanitizing the file “to remove information that is not visible in the file, such as comments, metadata, or hidden layers.” Apple’s Preview guide documents viewing a file’s information and no feature for stripping it, so do not treat “re-saved in Preview” as cleaned. (Sources: Adobe Experience League; Apple, Preview user guide.) Format-by-format detail: how to redact Word, PDF and Excel.
When document metadata leaked: the cases
The failure mode is always the same: the sender looked at the page, the recipient looked at the file. In January 2025 404 Media reported that “the senders of the memos failed to scrub the metadata from those documents”. It named James Sherk and Noah Peters as the authors of the memos, which the US Office of Personnel Management had sent to federal employees. (Source: 404 Media, 27 January 2025 — the names appear in the article’s summary; the article is paywalled beyond the preview, and the file format is not established there.) In 2003 the UK government’s Iraq dossier was published as a Word file whose revision log named the officials who had worked on it. (Source: Richard M. Smith’s 2003 analysis, via mikemurr.com; Smith’s original page is unreachable as of 3 September 2026.)
Why not just upload it to an online metadata remover
Because the first instruction on those sites is the thing you are trying to avoid. Metadata2Go’s process begins with “Upload your file,” and the same page hedges the outcome: “We try to remove all metadata, but it is not always possible to detect and remove every piece.” Even iLovePDF draws the line itself: its blog says the desktop app keeps “everything … on your device, no uploading unless you choose to.” For a settlement draft, the upload is the exposure you set out to prevent — and Word’s inspector does the job on your own machine at no cost. (Sources: Metadata2Go; iLovePDF blog, accessed 3 September 2026.)
When the names are in the text itself
Here is the sequence that catches careful people out. You inspect the file, remove all six categories, re-inspect and get a clean result. Then you send a document with no author, no comments, no revision marks — and the claimant’s full name, home address and account number still in paragraph three. The inspector was never built to touch that, and it is the half that matters when the file goes to a counterparty, a court or a chat window. By hand it means replacing every occurrence consistently in the body, headers, footers and footnotes, then remembering what you replaced when the answers come back.
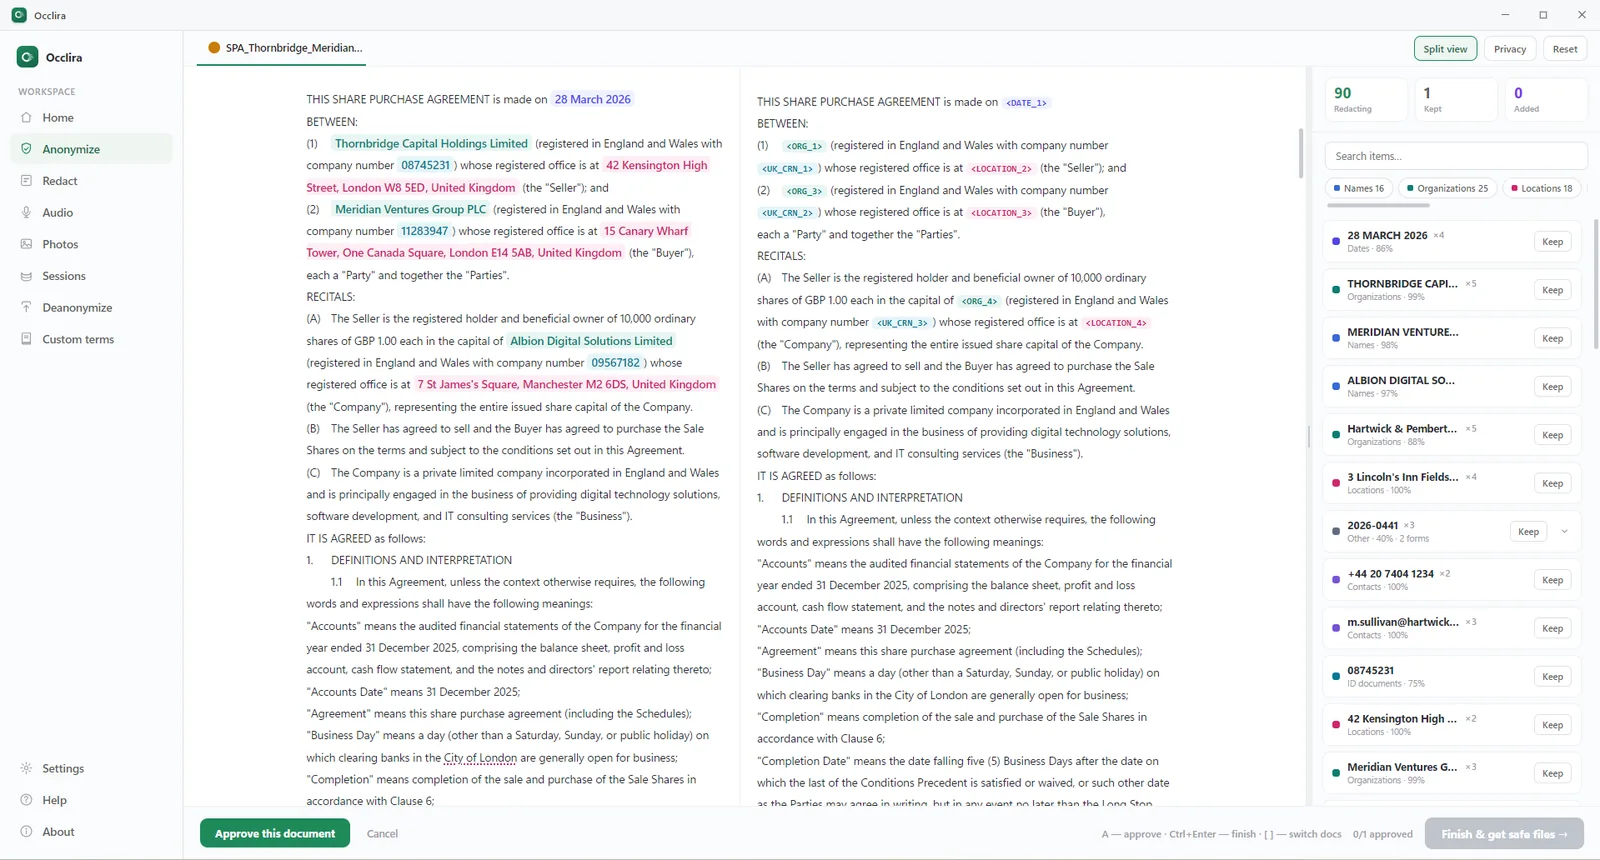
Occlira does that second half on your own computer. It is a desktop app for Windows and macOS (Apple Silicon); detection runs on your machine, and the app goes online only to activate the licence (via Polar), download its model and check for updates. Open the .docx and it finds the personal data in the text, scores each item by confidence, and lets you confirm what to remove or select anything it missed.
What you get back is still a Word file: the formatting intact, and the comments, tracked changes and document
properties cleaned in the same pass. Identifiers in the text are replaced by consistent placeholders such as
<PERSON_1>, so the same person stays the same placeholder from page one to page thirty. The
mapping that reverses it stays on your own machine (~/.occlira/mappings, owner-only permissions,
deleted after seven days by default). Deanonymize puts the real values back into a
*_restored copy whenever you need them, and in between you can take the anonymized copy to an
assistant — pasting it with Copy anonymized text or uploading it with your prompt, as in
anonymize before ChatGPT. PDFs, emails and scans come back as
anonymized .txt files, not as a redacted PDF.
If you would rather not leave Word, the Occlira add-in shields a document’s personal data from inside it, with the same review before anything is replaced and the values restorable later; it runs in desktop Word on Windows and macOS, with the desktop app open on the same computer.
One honest limit: swapping names for placeholders while keeping a mapping is pseudonymization, not anonymization. Under the GDPR the result is still personal data, because it can be reversed. Treat it as data minimization — it helps, it does not guarantee compliance, and it is not legal advice. See what counts as PII for the identifiers that matter, and Occlira for law firms for how this fits a confidentiality workflow.
Checklist before you send a Word file
- On a copy, never the working original: run the Document Inspector, Remove All on each finding, then re-inspect until nothing you meant to remove is listed. Before you Remove All on “Headers, Footers, and Watermarks” or on the comments category, know what is in them: both delete visible work, not just metadata.
- Read File → Properties → Summary yourself: Title, Subject, Author, Manager, Company, Category, Keywords, Comments.
- Look for what the inspector says it cannot see: text hidden by white-on-white formatting rather than the Hidden font effect, and objects sitting under other objects.
- Decide about comments explicitly: delete them, or accept that the labels may go generic (community-reported), while the text stays as written.
- Exporting to PDF? Open More Options → Options and clear the “Document properties” checkbox.
- Finally, read the file the way the recipient will — body text, headers, footnotes, file name — and replace the names you find there.
Frequently asked questions
On Windows, open a copy of the file and go to File → Info → Check for Issues → Inspect Document, click Inspect, then Remove All next to each result, and re-inspect to confirm. Microsoft recommends a copy because “it is not always possible to restore the data that the Document Inspector removes.” On a Mac there is no Document Inspector: you edit the properties by hand through File → Properties. In Word for the web, viewing or changing document properties “isn’t currently possible” — open the file in the desktop app instead.
The built-in Office tool that finds and strips hidden and personal data before you share a file, at File → Info → Check for Issues → Inspect Document. For Word, Microsoft lists six categories. Longer lists you may have seen include “Macros or VBA code”: that one sits on the Excel and PowerPoint tabs of the same page, not the Word one.
The Document Inspector removes the Author field with the rest of “Document Properties and Personal Information,” and File → Properties → Summary lets you blank it by hand. The Trust Center’s “Remove personal information from file properties on Save” keeps your name off future saves; Microsoft says it is “turned off in Excel, PowerPoint, and Word” by default.
No: “There is some information that the Document Inspector cannot remove,” in Microsoft’s words. It misses text hidden by other methods, “for example, white text on a white background,” and objects covered by other objects.
No documented Microsoft setting renames the people inside comments; the Document Inspector removes comments and revision marks together, as one category. On Microsoft’s Q&A forum, users of a SharePoint-hosted document describe comment authors turning generic: “when we save the document and reopen the name changes to ‘Author’.” That is a community thread, not documentation, and relabelling leaves the comment text untouched.
Not on its own. Word’s export dialog carries the properties across unless you clear the “Document properties” checkbox under More Options → Options. The NSA made the same point in 2005: “merely converting an MS Word document to PDF does not remove all [sensitive] metadata automatically.”
By hand. Microsoft states that “Word for Mac doesn’t have a document inspector. You can, however, view or change properties manually”: File → Properties, then the Summary tab to edit fields and the Custom tab to Delete one. Comments, tracked changes and hidden text have no Mac equivalent on Microsoft’s page.
No. Microsoft’s page says “Viewing or changing document properties isn’t currently possible in Word for the web.” The route it offers is Editing → Open in Desktop App.
In Acrobat it is two passes: the Redact tool to “permanently remove private or sensitive information from a PDF,” then sanitizing, which Adobe describes as removing “information that is not visible in the file, such as comments, metadata, or hidden layers.”
Read the first instruction. Metadata2Go’s process starts “Upload your file,” and the same page warns “We try to remove all metadata, but it is not always possible to detect and remove every piece.” For a confidential file, that upload is the disclosure you were trying to avoid.
Remove the metadata and the names, locally
Clean a Word document’s hidden layer and the personal data inside it on your own computer, then restore the real values when you need them. Free for 14 days on Windows and macOS (Apple Silicon).
More: what is PII? · blur faces & strip photo EXIF · local vs cloud redaction · how your data is handled